After I completed my first Little Gem build, I was still uncertain whether I liked the design or not. I had used an ultra-cheap, tiny speaker, and damaged it when installing it– so would it sound better with a better speaker? Could I squeeze out more headroom? (headroom is a term for being able to crank up an amp’s volume and still not distort the sound– useful for some players, but not for others. I prefer more headroom than your average heavy metal shredder, who might have little use of a clean tone.)
I decided that the only way to really be able to test the amp and to compare other modifications and mini-amp designs was to build a capable cab (speaker cabinet), and use it to test the designs I build. But how to build a cab?
I decided not to buy a cab, because the cheapest ones I could find ran $130+, and were butt-ugly. Surely I could build something better? But how? After checking out Shavano Music Online, DIY Guitarist, Duncan’s Amp Pages, and this page, I had a feel for what I needed to to, and that I was capable. I just had to figure out exactly what I wanted.
Speakers are a big deal. I remember as I was first shopping for amps discovering that the speakers that make good guitar amps are somewhat specialized. Modern speakers are fantastically well made– they can reproduce almost the full range of sounds humans are capable of hearing, with perfect clarity, and without ‘coloring’ or altering the sound of the music they reproduce. For guitar amps, this sucks.
Because guitar amps are supposed to create tone, not reproduce it.
One of the reasons that older, vintage amps are so prized, is that speaker technology 40 years ago sucked. Speakers created warmth and color because they were not as well designed as those of today, from a hi-fi perspective.
Beavis Audio has a project page on a pair of cabinets made from wooden trashcans (have I mentioned that Dano’s a freakin’ genius?). This is where I realized that I didn’t have to go all out and learn a bunch of difficult carpentry skills. It’s also where I learned about Weber Speakers. Weber makes speakers with all the design ‘flaws’ that make guitar amps sound great. They’ve got a huge selection, as well as amp & cab kits, and lots of info for anyone trying to understand how amps & speakers work, particularly regarding the tricky subject of impedance.
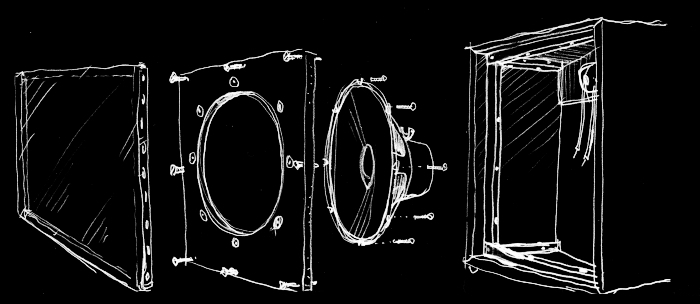
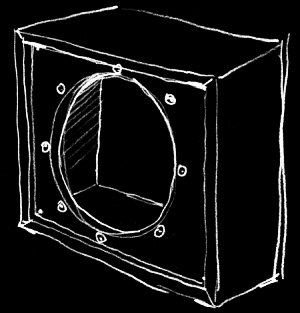
I ordered one of their 8″ ‘Signature’ Speakers. An alnico for $35. I quickly sketched up a design for a box, 15″ on a side and 7″ deep. Off to the hardware store! Cabs are usually covered in carpet or ‘tolex,’ a kind of leatherette. I didn’t want to bother with this, which meant I had to choose nicer-looking wood than is often used. I found 1×8 hemlock for an ok price. For the baffle (the panel that the speaker mounts to), I bought 3/4″ particle board, a 1/4 sheet. Now personally, I hate particle board. It’s heavy, ugly, and sucks moisture like a sponge. But it is flat, very flat. The Weber site warns against using a baffle that isn’t perfectly flat. They use steel baskets (the frame that supports the speaker cone) that are very thin, and bolting them to a slightly warped baffle can bend them out of shape, causing a ‘rub’ (where the coil rubs against the magnet), which can result in ugly noise, and eventually fire. This is bad. So, particle board for the baffle. Ugh. I grabbed T-nuts and matching screws for the mounting, a box of wood screws, and furring strips (strips of straight wood with a 3/4″ square cross-section.
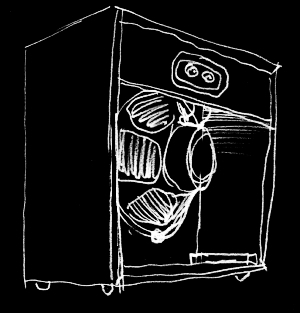
At Radio Shack I picked up speaker connectors, a kind that accepts both banana plugs and bare wire. I had a scrap of plywood for a panel to hold the connectors. At a nearby fabric store I picked up a yard of speaker cloth, after a fair bit of trouble. The gals there didn’t know what ‘grille cloth’ was, and were apparently irked that a big ugly male had invaded their store looking to spend money, completely oblivious to their esoteric rituals and methods (I thought I was going to be kicked out when I produced a coupon at apparently the wrong time). It took a bit of talking before they finally sold me some speaker cloth, which is not as attractive as grille cloth, but would serve the purpose.
With all my materials in hand, it was time to come up with a plan, and build the damn thing, which I’ll cover in the next post.